Current status of ultra-precision manufacturing of complex curved aluminum reflectors
-
摘要:
由于复杂曲面铝反射镜所具有的独特优势,其在光学系统中的应用越来越广泛。但是只采用超精密车削加工的光学反射镜精度受到超精密车削加工“误差复映”的限制,只能满足红外系统应用需求,其应用的进一步推广遭遇瓶颈。采用超精密车削、磁流变抛光、计算机控制表面成形(CCOS)的组合加工工艺,并结合复杂光学曲面的计算全息图法(CGH)面形检测技术,可以进一步提升铝反射镜的面形精度,满足可见光系统的应用需求,为复杂曲面铝合金反射镜的推广奠定了制造基础。
-
关键词:
- 复杂曲面 /
- 铝反射镜 /
- 超精密车削 /
- 抛光 /
- 计算全息图法(CGH)
Abstract:Due to the unique advantages of complex curved aluminum mirrors, its application in optical systems is becoming more and more widespread. However, the accuracy of optical mirrors that are only processed by ultra-precision turning is limited by the "error reflection" of ultra-precision turning, which can only meet the application requirements of infrared systems, and its further promotion and application have encountered bottlenecks. The combined processing technology of ultra-precision turning, magnetorheological polishing, and computer-controlled surface forming (CCOS), combined with the computational hologram method (CGH) of the complex optical curved surface (CGH) surface shape detection technology, can further improve the surface shape accuracy of the aluminum reflector, to meet the application requirements of visible light systems, and lay the foundation for the promotion and application of complex curved aluminum alloy mirrors.
-

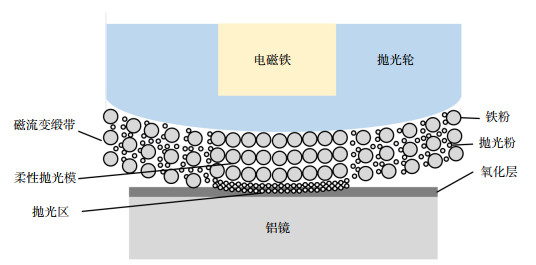
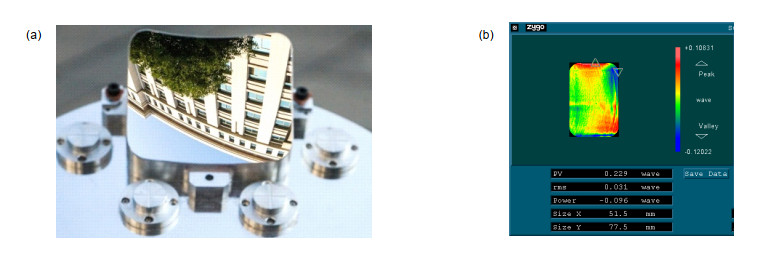
Overview: The use of complex curved aluminum reflectors can simplify the structure of the optical system, facilitate the manufacture of complex curved surfaces, reduce the quality of the system, provide a more flexible system layout, have a higher degree of design freedom, and can be integrated without heat. Advantages such as design, its application in high-performance optical systems is becoming more and more extensive. Adopt ultra-precision turning processing of complex curved aluminum mirror, one-time processing can obtain a nano-level smooth surface, and the processing repeatability is good, the production efficiency is high, suitable for mass production, and the processing cost is low, but the accuracy is subject to the ultra-precision turning processing error. The limitation of "Review" can only meet the application requirements of infrared system. If you want to get a complex curved aluminum mirror that meets higher requirements, after ultra-precision turning, you must use a subsequent polishing process to improve the surface accuracy of the aluminum mirror and improve its surface quality. At present, the more mature processing methods for polishing aluminum mirrors after ultra-precision turning mainly include computer controlled surface forming (CCOS) polishing and magnetorheological polishing (MRF) developed based on the principle of CCOS technology. CCOS polishing of aluminum alloy mirrors uses the positive pressure of the polishing abrasive and relative motion to mechanically remove the oxide layer formed on the surface of the aluminum mirror by the chemical reaction of the polishing liquid, which can improve the surface accuracy while controlling the surface quality. Magnetorheological polishing is an ultra-precision optical processing technology between contact and non-contact based on the principle of CCOS molding. It can perform deterministic processing of complex curved optical elements. It has a stable polishing process, easy to realize computer control, and materials. The removal efficiency is high, the polishing head is not worn, and high-quality optical surfaces can be obtained. The outstanding advantage of MRF polishing compared to CCOS polishing technology is that the removal function is stable and accurate, and it can adapt to changes in local curvature when polishing aspheric curved mirrors with complex curved surfaces. The use of magnetorheological polishing, computer-controlled surface forming and other post-polishing processing techniques, combined with the current computational hologram (CGH) surface shape detection technology with the highest accuracy in detecting complex curved surface shapes, can further improve the surface accuracy of complex curved aluminum reflector, to meet the application requirements of visible light systems, and lay the foundation for the promotion and application of complex curved aluminum alloy mirrors.
-

-
-
[1] 李信磊.复杂曲面铝反射镜磁流变抛光关键技术研究[D].长沙: 国防科技大学, 2018: 1–51.
Li X L. Research on the key technology of magnetorheological polishing of complex curved aluminum mirror[D]. Changsha: National University of Defense Technology, 2018: 1–51.
[2] 张艺.金属铝镜直接光学抛光关键技术研究[D].长沙: 国防科技大学, 2014: 1–59.
Zhang Y. Research on the key technologies of direct optical polishing of metal aluminum mirrors[D]. Changsha: National University of Defense Technology, 2014: 1–59.
http://cdmd.cnki.com.cn/Article/CDMD-90002-1016921752.htm [3] 张东阁, 傅雨田.铝合金反射镜的发展与应用[J].红外技术, 2015, 37(10): 814–823. http://www.wanfangdata.com.cn/details/detail.do?_type=perio&id=hwjs201510003
Zhang D G, Fu Y T. Development and application of aluminum mirrors in optical system[J]. Infrared Technology, 2015, 37(10): 814–823. http://www.wanfangdata.com.cn/details/detail.do?_type=perio&id=hwjs201510003
[4] Saunders I J, Ploeg L, Dorrepaal M, et al. Fabrication and metrology of freeform aluminum mirrors for the SCUBA-2 instrument[J]. Proceedings of SPIE, 2005, 5869: 586905. doi: 10.1117/12.612998
[5] Atad-Ettedgui E, Peacocke T, Montgomery D, et al. Opto-mechanical design of SCUBA-2[J]. Proceedings of SPIE, 2006, 6273: 62732H. http://www.researchgate.net/publication/252095886_Opto-mechanical_design_of_SCUBA2?ev=auth_pub
[6] Beier M, Hartung J, Peschel T, et al. Development, fabrication, and testing of an anamorphic imaging snap-together freeform telescope[J]. Applied Optics, 2015, 54(12): 3530–3542. doi: 10.1364/AO.54.003530
[7] 李荣彬, 孔令豹, 张志辉, 等.微结构自由曲面的超精密单点金刚石切削技术概述[J].机械工程学报, 2013, 49(19): 144–155. http://www.wanfangdata.com.cn/details/detail.do?_type=perio&id=jxgcxb201319018
Li R B, Kong L B, Zhang Z H, et al. An overview of ultra-precision diamond machining of microstructured freeform surfaces[J]. Journal of Mechanical Engineering, 2013, 49(19): 144–155. http://www.wanfangdata.com.cn/details/detail.do?_type=perio&id=jxgcxb201319018
[8] 王贵林, 朱登超, 戴一帆.复杂光学表面的快刀伺服加工特性与路径规划[J].机械工程学报, 2011, 47(15): 175–180. http://www.wanfangdata.com.cn/details/detail.do?_type=perio&id=jxgcxb201115026
Wang G L, Zhu D C, Dai Y F. Machining characteristics and route planning of complex optical surface by using fast tool servo[J]. Journal of Mechanical Engineering, 2011, 47(15): 175–180. http://www.wanfangdata.com.cn/details/detail.do?_type=perio&id=jxgcxb201115026
[9] 关朝亮.复杂光学曲面慢刀伺服超精密车削技术研究[D].长沙: 国防科学技术大学, 2010: 1–132.
Guan C L. Study on the technology of slow tool servo ultra-precision diamond turning for complex optical surface[D]. Changsha: National University of Defense Technology, 2010: 1–132.
http://cdmd.cnki.com.cn/Article/CDMD-90002-2010271296.htm [10] Kirschstein S, Koch A, Schöneich J, et al. Metal mirror TMA, telescopes of the JSS product line: design and analysis[J]. Proceedings of SPIE, 2005, 5962: 59621M. doi: 10.1117/12.624354
[11] Risse S, Gebhardt A, Damm C, et al. Novel TMA telescope based on ultra precise metal mirrors[J]. Proceedings of SPIE, 2008, 7010: 701016. doi: 10.1117/12.789824
[12] 邓金球.铝合金反射镜超精密抛光关键技术研究[D].长沙: 国防科技大学, 2017: 1–71.
Deng J Q. Study on the key techniques of ultra-precision polishing of aluminum alloy mirrors[D]. Changsha: National University of Defense Technology, 2017: 1–71.
http://cdmd.cnki.com.cn/Article/CDMD-91002-1020701886.htm [13] Scheiding S, Damm C, Holota W, et al. Ultra-precisely manufactured mirror assemblies with well-defined reference structures[J]. Proceedings of SPIE, 2010, 7739: 773908. doi: 10.1117/12.856244
[14] Risse S, Scheiding S, Gebhardt A, et al. Development and fabrication of a hyperspectral, mirror based IR-telescope with ultra-precise manufacturing and mounting techniques for a snap-together system assembly[J]. Proceedings of SPIE, 2011, 8176: 81761N. doi: 10.1117/12.898025
[15] 龙波, 邢廷文, 廖胜.铝镜消应力支撑及SPDT辅助装配设计[J].光电工程, 2014, 41(3): 1–6. doi: 10.3969/j.issn.1003-501X.2014.03.001
Long B, Xing T W, Liao S. Design of stress-relief support of aluminum mirrors and assembly assisted by SPDT[J]. Opto-Electronic Engineering, 2014, 41(3): 1–6. doi: 10.3969/j.issn.1003-501X.2014.03.001
[16] 柳鸣, 张立中, 李响, 等.空间轻小型反射镜柔性支撑设计与动力学分析[J].光电工程, 2018, 45(5): 170686. doi: 10.12086/oee.2018.170686
Liu M, Zhang L Z, Li X, et al. Design of flexure support of space compact reflector subassembly and dynamic analysis[J]. Opto-Electronic Engineering, 2018, 45(5): 170686. doi: 10.12086/oee.2018.170686
[17] 葛坤鹏, 李圣怡, 胡皓.铝合金反射镜磁流变抛光表面质量控制的参数优化[J].纳米技术与精密工程, 2017, 15(2): 151–157. http://www.wanfangdata.com.cn/details/detail.do?_type=perio&id=nmjsyjmgc201702012
Ge K G, Li S Y, Hu H. Parameters optimization of surface quality control on magnetorheological finishing for aluminum alloy mirror[J]. Nanotechnology and Precision Engineering, 2017, 15(2): 151–157. http://www.wanfangdata.com.cn/details/detail.do?_type=perio&id=nmjsyjmgc201702012
[18] Schaefer J P. Advanced metal mirror processing for tactical ISR systems[J]. Proceedings of SPIE, 2013, 8713: 871306. doi: 10.1117/12.2015496
[19] Beier M, Scheiding S, Gebhardt A, et al. Fabrication of high precision metallic freeform mirrors with magnetorheological finishing (MRF)[J]. Proceedings of SPIE, 2013, 8884: 88840S. doi: 10.1117/12.2035986
[20] 周林.光学镜面离子束修形理论与工艺研究[D].长沙: 国防科学技术大学, 2008: 1–112.
Zhou L. Study on theory and technology in ion beam figuring for optical surfaces[D]. Changsha: National University of Defense Technology, 2008: 1–112.
http://cdmd.cnki.com.cn/Article/CDMD-90002-2010164869.htm [21] Kinast J, Schlegel R, Kleinbauer K, et al. Manufacturing of aluminum mirrors for cryogenic applications[J]. Proceedings of SPIE, 2018, 10706: 107063G. http://www.wanfangdata.com.cn/details/detail.do?_type=perio&id=CC027032537
[22] Schwalm M, Akerstrom A, Barry M, et al. Hardware results for the Wide-field Infrared Survey Explorer (WISE) telescope and scanner[J]. Proceedings of SPIE, 2010, 7731: 77310Y. doi: 10.1117/12.857499
[23] Sampath D, Akerstrom A, Barry M, et al. The WISE telescope and scanner: design choices and hardware results[J]. Proceedings of SPIE, 2010, 7796: 779609. doi: 10.1117/12.864347
[24] 潘龙, 宫虎, 房丰洲.大尺寸自由曲面铝反射镜超精密抛光工艺[J].纳米技术与精密工程, 2015, 13(2): 108–112. http://www.wanfangdata.com.cn/details/detail.do?_type=perio&id=nmjsyjmgc201502004
Pan L, Gong H, Fang F Z. Ultra-precision polishing process of large free-form surface aluminum miror[J]. Nanotechnology and Precision Engineering, 2015, 13(2): 108–112. http://www.wanfangdata.com.cn/details/detail.do?_type=perio&id=nmjsyjmgc201502004
[25] Zhang J Z, Zhang X, Tan S L, et al. Design and manufacture of an off-axis aluminum mirror for visible-light imaging[J]. Current Optics and Photonics, 2017, 1(4): 364–371. http://www.researchgate.net/publication/320143755_Design_and_manufacture_of_an_off-axis_aluminum_mirror_for_visible-light_imaging
[26] Zhao T, Hu H, Peng X Q, et al. Study on the surface crystallization mechanism and inhibition method in the CMP process of aluminum alloy mirrors[J]. Applied Optics, 2019, 58(22): 6091–6097. doi: 10.1364/AO.58.006091
[27] Li H Y, Walker D, Zheng X, et al. Advanced techniques for robotic polishing of aluminum mirrors[J]. Proceedings of SPIE, 2018, 10692: 106920N.
[28] Li H Y, Walker D D, Zheng X, et al. Mid-spatial frequency removal on aluminum free-form mirror[J]. Optics Express, 2019, 27(18): 24885–24899. doi: 10.1364/OE.27.024885
[29] Hartung J, Vov Lukowicz H, Kinast J. Theoretical compensation of static deformations of freeform multimirror substrates[J]. Applied Optics, 2018, 57(15): 4020–4031. doi: 10.1364/AO.57.004020
[30] 黎发志, 郑立功, 闫锋, 等.自由曲面的CGH光学检测方法与实验[J].红外与激光工程, 2012, 41(4): 1052–1056. http://www.wanfangdata.com.cn/details/detail.do?_type=perio&id=hwyjggc201204040
Li F Z, Zheng L G, Yan F, et al. Optical testing method and its experiment on freeform surface with computer-generated hologram[J]. Infrared and Laser Engineering, 2012, 41(4): 1052–1056. http://www.wanfangdata.com.cn/details/detail.do?_type=perio&id=hwyjggc201204040
[31] 甘子豪, 彭小强, 陈善勇.用于复杂曲面检验校准的CGH关键技术[J].中国计量, 2019, 24(6): 80–85. http://www.cnki.com.cn/Article/CJFDTotal-JILA201906045.htm
Gan Z H, Peng X Q, Chen S Y. CGH key technology for inspection and calibration of complex surfaces[J]. China Metrology, 2019, 24(6): 80–85. http://www.cnki.com.cn/Article/CJFDTotal-JILA201906045.htm
[32] Ma J, Pruss C, Häfner M, et al. Systematic analysis of the measurement of cone angles using high line density computer-generated holograms[J]. Optical Engineering, 2011, 50(5): 055801. doi: 10.1117/1.3575649
[33] Poleshchuk A G, Korolkov V P, Nasyrov R K, et al. Computer generated holograms: Fabrication and application for precision optical testing[J]. Proceedings of SPIE, 2008, 7102: 710206. doi: 10.1117/12.797816
[34] Scheiding S, Beier M, Zeitner U D, et al. Freeform mirror fabrication and metrology using a high performance test CGH and advanced alignment features[J]. Proceedings of SPIE, 2013, 8613: 86130J. doi: 10.1117/12.2001690
[35] 谢意, 陈强, 伍凡, 等.用双计算全息图检测凹非球面[J].光学学报, 2008, 28(7): 1313–1317. http://www.wanfangdata.com.cn/details/detail.do?_type=perio&id=gxxb200807018
Xie Y, Chen Q, Wu F, et al. Concave aspherical surface testing with twin computer-generated holograms[J]. Acta Optica Sinica, 2008, 28(7): 1313–1317. http://www.wanfangdata.com.cn/details/detail.do?_type=perio&id=gxxb200807018
[36] Gan Z H, Peng X Q, Chen S Y, et al. Fringe discretization and manufacturing analysis of a computer-generated hologram in a null test of the freeform surface[J]. Applied Optics, 2018, 57(34): 9913–9921. doi: 10.1364/AO.57.009913
-


 E-mail Alert
 RSS
RSS
 下载:
下载:
