-
摘要:
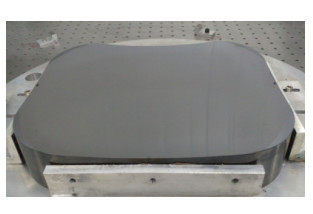
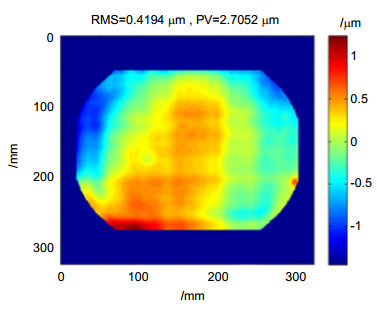
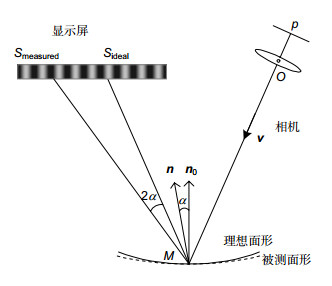
条纹反射测量技术具有动态范围大、灵敏度高的特点,通过高精度的系统标定可以获得很高的测量精度。本文研究将条纹反射测量技术应用于离轴非球面反射镜粗抛光阶段的面形检测,使用激光跟踪仪建立检测系统坐标系,然后将相机和显示屏的实测标定数据代入坐标系并在Zemax软件中建立测量装置的理想模型,通过光线追迹得到理想的屏幕像素点位置,采用相移技术可以得到实测时屏幕像素点位置,从而计算得到被测镜面形的斜率误差,最后积分得到检测结果。文中采用该方法对一块SiC离轴非球面镜进行了实测,并与三坐标测量机的结果进行对比,验证了方法的可行性,可用于指导离轴非球面镜粗抛光阶段的加工。
 Abstract:
In this paper, the FRT (fringe reflection technique) is used for the off-axis aspheric surface measurement during the manufacture stage of the beginning of polish, duo to its advantage of large dynamic range and high sensitivity. The measurement system coordinate and ray trace model are build using the laser tracker, and the calibration results of the camera calibration and screen calibration are introduced into the Zemax model and the ideal screen pixel point position can be got by ray tracing. The measurement of screen pixel point position is obtained by phase-shifting technique. The slope error of the surface is calculated and final results are got by integration. The measurement results of a SiC off-axis mirror obtained by the presented method and the CMM are compared and feasibility is verified. This method can be used to guide the manufacture of off-axis aspheric surface during the beginning of the polish.
-
Key words:
- optical testing /
- off-axis aspheric mirror /
- fringe reflection technique /
- ray trace
-

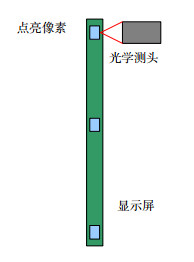
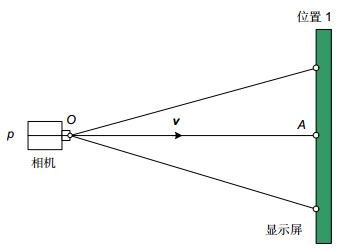
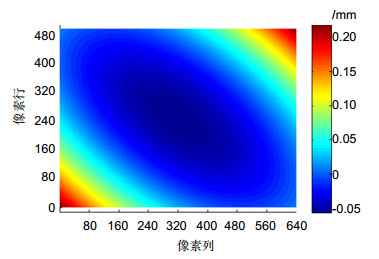
Overview: Generally, manufacture of off aspheric surfaces is divided into three stages: milling stage, fine grinding and rough polishing stage, and fine polishing stage. During the rough polishing, the scale of the shape error is large and the interferometer cannot be used for testing due to its limited dynamic range. FRT (fringe reflection technique) is a non-contact profilometry for the measurement of specular optical surfaces. In this paper, FRT is used for the off-axis aspheric surface measurement during the manufacture stage of the beginning of polish with its advantage of large dynamic range and high sensitivity. The basic principle is to project sinusoidal fringe patterns onto a screen located remotely from the surface under test, and the reflected fringe patterns via the surface are captured by the digital camera. The recorded pattern image by the CCD will be distorted and the distortion depends on the reflecting surface. The surface slope variation of the surface can be calculated accurately according to distortions of the patterns and the surface error map is integrated from the slope errors. This method is able to achieve high dynamic range slope measurement by using computer-controlled large displays as light source without requiring specially designed null optics. Also, this technique is completely incoherent which avoids the coherent noise in interferometry test. To reach the high accuracy of measurement, the system calibration is required. Here, the optical CMM, which is a modified CMM using a point source microscope (PSM) as the probing arm, is used for the calibration. The screen pixel position and shape bending are calibrated by the optical CMM. The CCD pinhole position and the ray direction of each camera pixel are calibrated by the optical CMM and pattern images. In the test, the measurement system coordinate and ray trace model are build using the laser tracker, and then the calibration results of the camera calibration and screen calibration are introduced into the Zemax model to establish a virtual null test model and the ideal screen pixel point position can be got by ray tracing. The measurement screen pixel point position is obtained by phase-shifting technique. The slope error of the surface is calculated and final results are got by integration. The measurement results of a SiC off-axis mirror by both the presented method and the CMM are compared. The difference is below 0.5 μm RMS. The feasibility is verified and this method can be used to guide the manufacture of off-axis aspheric surface during the beginning of the polish.
-

-
表 1 实验装置部件主要参数
Table 1. Specification of the test setup
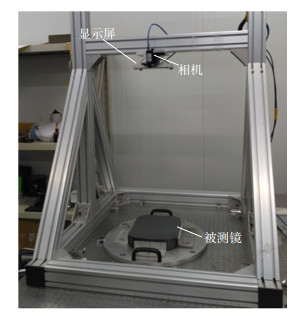
项目 品牌 型号 主要参数 CCD相机 Point Grey GS3-U3-28S5M 靶面大小:2/3英寸,分辨率:1440 pixels×1920 pixels 条纹显示屏 Liliput UM-70 7英寸显示屏,分辨率:600 pixels×480 pixels 1英寸=25.4 mm -
[1] 潘君骅.光学非球面的设计、加工与检验[M].北京:科学出版社, 1994: 145-152.
Pan J H. The Design, Manufacture and Test of the Aspherical Optical Surfaces[M]. Beijing: Science Press, 1994: 145-152.
[2] 林晶, 崔庆丰, 朱浩.宽幅离轴三反光学系统研究[J].光学学报, 2013, 33(7): 0722002. http://www.cnki.com.cn/Article/CJFDTotal-GXXB201307045.htm
Lin J, Cui Q F, Zhu H. Research of broad width off-axis three mirror optical system[J]. Acta Optica Sinica, 2013, 33(7): 0722002. http://www.cnki.com.cn/Article/CJFDTotal-GXXB201307045.htm
[3] 武中华, 袁吕军, 朱永田, 等, 离轴非球面在细磨与粗抛阶段的波面再现技术[J].光子学报, 2017, 46(3): 123-129. http://www.irgrid.ac.cn/handle/1471x/830877/handle/1471x/830837/browse?type=title&sort_by=1&order=ASC&rpp=20&starts_with=A
Wu Z H, Yuan L J, Zhu Y T, et al. Technology of wavefront retrieval for off-axis aspheric surface in the stage of fine-grinding and rough-polishing[J]. Acta Photonica Sinica, 2017, 46(3): 123-129. http://www.irgrid.ac.cn/handle/1471x/830877/handle/1471x/830837/browse?type=title&sort_by=1&order=ASC&rpp=20&starts_with=A
[4] 程灏波.精研磨阶段非球面面形接触式测量误差补偿技术[J].机械工程学报, 2005, 41(8): 228-232. http://www.opticsjournal.net/Abstract.htm?aid=OJ121012000257qXtZw3
Cheng H B. Touch trigger probe measurement accuracy of aspheric mirror during fine lapping process[J]. Chinese Journal of Mechanical Engineering, 2005, 41(8): 228-232. http://www.opticsjournal.net/Abstract.htm?aid=OJ121012000257qXtZw3
[5] 林长青, 景洪伟, 匡龙, 等.离轴非球面镜精磨阶段的三坐标检测技术[J].强激光与离子束, 2012, 24(11): 2665-2668. http://www.wanfangdata.com.cn/details/detail.do?_type=perio&id=qjgylzs201211031
Lin C Q, Jing H W, Kuang L, et al. Measuring technique for off-axis aspherical mirror in fine grinding process using coordinate measurement machine[J]. High Power Laser and Particle Beams, 2012, 24(11): 2665-2668. http://www.wanfangdata.com.cn/details/detail.do?_type=perio&id=qjgylzs201211031
[6] 李杰, 伍凡, 吴时彬, 等.使用激光跟踪仪测量研磨阶段离轴非球面面形[J].光学学报, 2012, 32(1): 0112002. http://www.cnki.com.cn/Article/CJFDTOTAL-TWXB201202009.htm
Li J, Wu F, Wu S B, et al. Using a laser tracker to measure the surface of off-axis aspheric mirror during grinding[J]. Acta Optica Sinica, 2012, 32(1): 0112002. http://www.cnki.com.cn/Article/CJFDTOTAL-TWXB201202009.htm
[7] Su P, Parks R E, Wang L R, et al. Software configurable optical test system: a computerized reverse Hartmann test[J]. Applied Optics, 2010, 49(23): 4404-4412. doi: 10.1364/AO.49.004404
[8] Huang R, Su P, Burgea J H. Deflectometry measurement of Daniel K. Inouye solar telescope primary mirror[J]. Proceedings of the SPIE, 2015, 9575: 957515. doi: 10.1117/12.2189258
[9] 袁婷, 张峰, 陶小平, 等.条纹反射法检测光学反射镜面形[J].光学学报, 2015, 44(9): 0912004. http://www.cnki.com.cn/Article/CJFDTotal-GZXB201509017.htm
Yuan T, Zhang F, Tao X P, et al. Test of optical mirror surface using fringe reflection system[J]. Acta Photonica Sinica, 2015, 44(9): 0912004. http://www.cnki.com.cn/Article/CJFDTotal-GZXB201509017.htm
[10] 杨丽杰, 李大海, 鄂可伟, 等.基于空间直线预标定检测光学元件面形的研究[J].光学与光电技术, 2016, 14(3): 42-48. http://www.wanfangdata.com.cn/details/detail.do?_type=perio&id=gxygdjs201603006
Yang L J, Li D H, E K W, et al. Surface measurement of optical element based on the pre-calibrating camera[J]. Optics & Optoelectronic Technology, 2016, 14(3): 42-48. http://www.wanfangdata.com.cn/details/detail.do?_type=perio&id=gxygdjs201603006
[11] 肖君, 魏秀东, 卢振武.基于偏折原理的太阳能槽式聚光器面形快速检测方法[J].中国激光, 2013, 40(12): 1208006. http://wuxizazhi.cnki.net/Sub/jcwl/a/JJZZ201312033.html
Xiao J, Wei X D, Lu Z W. A fast surface shape measurement method for the parabolic trough solar concentrator based on deflectometry[J]. Chinese Journal of Lasers, 2013, 40(12): 1208006. http://wuxizazhi.cnki.net/Sub/jcwl/a/JJZZ201312033.html
[12] 赵文川, 范斌, 伍凡, 等.基于PMD的反射镜面检测实验分析[J].光学学报, 2013, 33(1): 0112002. http://www.cnki.com.cn/Article/CJFDTotal-GZXB201509017.htm
Zhao W C, Fan B, Wu F, et al. Experimental analysis of reflector test based on phase measuring deflectometry[J]. Acta Optica Sinica, 2013, 33(1): 0112002. http://www.cnki.com.cn/Article/CJFDTotal-GZXB201509017.htm
[13] 刘元坤, 苏显渝, 吴庆阳.基于条纹反射的类镜面三维面形测量方法[J].光学学报, 2006, 26(11): 1636-1640. doi: 10.3321/j.issn:0253-2239.2006.11.009
Liu Y K, Su X Y, Wu Q Y. Three-dimensional shape measurement for specular surface based on fringe reflection[J]. Acta Optica Sinica, 2006, 26(11): 1636-1640. doi: 10.3321/j.issn:0253-2239.2006.11.009
[14] Huang R, Su P, Burge J H, et al. High-accuracy aspheric x-ray mirror metrology using software configurable optical test system/deflectometry[J]. Optical Engineering, 2015, 54(8): 084103. doi: 10.1117/1.OE.54.8.084103
[15] 荆海龙, 苏显渝, 刘元坤.基于梯度数据的三维面形重建方法[J].激光杂志, 2007, 28(6): 41-43. http://www.opticsjournal.net/abstract.htm?aid=OJ100511000047nUqXtZ
Jing H L, Su X Y, Liu Y K. Shape reconstruction methods from gradient field[J]. Laser Journal, 2007, 28(6): 41-43. http://www.opticsjournal.net/abstract.htm?aid=OJ100511000047nUqXtZ
[16] 荆海龙, 苏显渝, 刘元坤.基于条纹反射的镜面测量及三维重建算法分析[J].光电工程, 2008, 35(10): 37-42. doi: 10.3969/j.issn.1003-501X.2008.10.008
Jing H L, Su X Y, Liu Y K. Specular surface measurement based on fringe reflection and analysis of 3D shape reconstruction technique[J]. Opto-Electronic Engineering, 2008, 35(10): 37-42. doi: 10.3969/j.issn.1003-501X.2008.10.008
[17] Parks R E, Kuhn W P. Optical alignment using the point source microscope[J]. Proceedings of SPIE, 2005, 5877: 102-116.
[18] Su X Y, Chen W J. Reliability-guided phase unwrapping algorithm: a review[J]. Optics and Lasers in Engineering, 2004, 42(3): 245-261. doi: 10.1016/j.optlaseng.2003.11.002
-


 E-mail Alert
 RSS
RSS
 下载:
下载:
